Linux
5 Best Tools to Find and Remove Duplicate Files in Linux
Organizing your home directory or even system can be particularly hard if you have the habit of downloading all kinds of stuff from the internet using your download managers.
Often you may find you have downloaded the same mp3, pdf, and epub (and all kinds of other file extensions) and copied it to different directories. This may cause your directories to become cluttered with all kinds of useless duplicated stuff.
In this tutorial, you are going to learn how to find and delete duplicate files in Linux using rdfind, fdupes, and rmlint command-line tools, as well as using GUI tools called DupeGuru and FSlint.
A note of caution – always be careful what you delete on your system as this may lead to unwanted data loss. If you are using a new tool, first try it in a test directory where deleting files will not be a problem.
1. Rdfind – Find Duplicate Files in Linux
Rdfind comes from redundant data find, which is a free command-line tool used to find duplicate files across or within multiple directories. It recursively scans directories and identifies files that have identical content, allowing you to take appropriate actions such as deleting or moving the duplicates.
Rdfind uses an algorithm to classify the files and detects which of the duplicates is the original file and considers the rest as duplicates.
The rules of ranking are:
- If A was found while scanning an input argument earlier than B, A is higher ranked.
- If A was found at a depth lower than B, A is higher ranked.
- If A was found earlier than B, A is higher ranked.
The last rule is used particularly when two files are found in the same directory.
Install Rdfind on Linux
To install rdfind in Linux, use the following command as per your Linux distribution.
$ sudo apt install rdfind         [On Debian, Ubuntu and Mint]
$ sudo yum install rdfind         [On RHEL/CentOS/Fedora and Rocky/AlmaLinux]
$ sudo emerge -a sys-apps/rdfind  [On Gentoo Linux]
$ sudo apk add rdfind             [On Alpine Linux]
$ sudo pacman -S rdfind           [On Arch Linux]
$ sudo zypper install rdfind      [On OpenSUSE]
To run rdfind on a directory simply type rdfind and the target directory.
$ rdfind /home/user
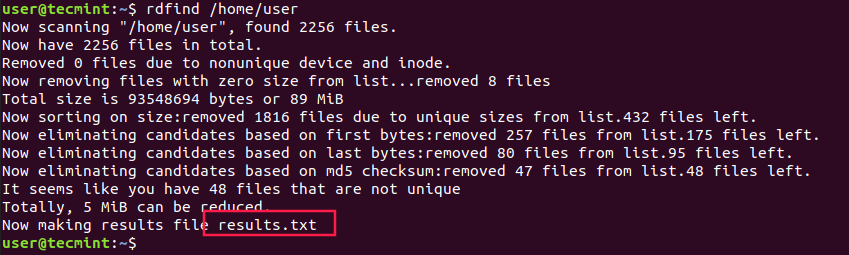
As you can see rdfind will save the results in a file called results.txt located in the same directory from where you ran the program. The file contains all the duplicate files that rdfind has found. You can review the file and remove the duplicate files manually if you want to.
Another thing you can do is to use the -dryrun an option that will provide a list of duplicates without taking any actions:
$ rdfind -dryrun true /home/user
When you find the duplicates, you can choose to replace them with hard links.
$ rdfind -makehardlinks true /home/user
And if you wish to delete the duplicates you can run.
$ rdfind -deleteduplicates true /home/user
To check other useful options of rdfind you can use the rdfind manual.
$ man rdfind
2. Fdupes – Scan for Duplicate Files in Linux
Fdupes is another command-line program that allows you to identify duplicate files on your system. It searches directories recursively, comparing file sizes and content to identify duplicates.
It uses the following methods to determine duplicate files:
- Comparing partial md5sum signatures
- Comparing full md5sum signatures
- byte-by-byte comparison verification
Just like rdfind, it has similar options:
- Search recursively
- Exclude empty files
- Shows the size of duplicate files
- Delete duplicates immediately
- Exclude files with a different owner
Install Fdupes in Linux
To install fdupes in Linux, use the following command as per your Linux distribution.
$ sudo apt install fdupes         [On Debian, Ubuntu and Mint]
$ sudo yum install fdupes         [On RHEL/CentOS/Fedora and Rocky/AlmaLinux]
$ sudo emerge -a sys-apps/fdupes  [On Gentoo Linux]
$ sudo apk add fdupes             [On Alpine Linux]
$ sudo pacman -S fdupes           [On Arch Linux]
$ sudo zypper install fdupes      [On OpenSUSE]
Fdupes syntax is similar to rdfind. Simply type the command followed by the directory you wish to scan.
$ fdupes <dir>
To search files recursively, you will have to specify the -r an option like this.
$ fdupes -r <dir>
You can also specify multiple directories and specify a dir to be searched recursively.
$ fdupes <dir1> -r <dir2>
To have fdupes calculate the size of the duplicate files use the -S option.
$ fdupes -S <dir>
To gather summarized information about the found files use the -m option.
$ fdupes -m <dir>

Finally, if you want to delete all duplicates use the -d an option like this.
$ fdupes -d <dir>
Fdupes will ask which of the found files to delete. You will need to enter the file number:
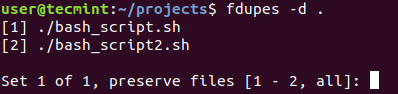
A solution that is definitely not recommended is to use the -N option which will result in preserving the first file only.
$ fdupes -dN <dir>
To get a list of available options to use with fdupes review the help page by running.
$ fdupes -help
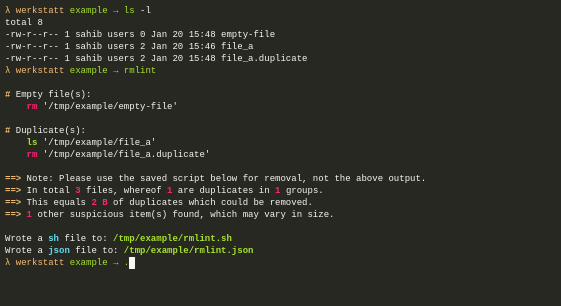
3. Rmlint – Remove Duplicate Files
Rmlint is a command-line tool that is used for finding and removing duplicate and lint-like files in Linux systems. It helps identify files with identical content, as well as various forms of redundancy or lint, such as empty files, broken symbolic links, and orphaned files.
Install Rmlint on Linux
To install Rmlint in Linux, use the following command as per your Linux distribution.
$ sudo apt install rmlint         [On Debian, Ubuntu and Mint]
$ sudo yum install rmlint         [On RHEL/CentOS/Fedora and Rocky/AlmaLinux]
$ sudo emerge -a sys-apps/rmlint  [On Gentoo Linux]
$ sudo apk add rmlint             [On Alpine Linux]
$ sudo pacman -S rmlint           [On Arch Linux]
$ sudo zypper install rmlint      [On OpenSUSE]
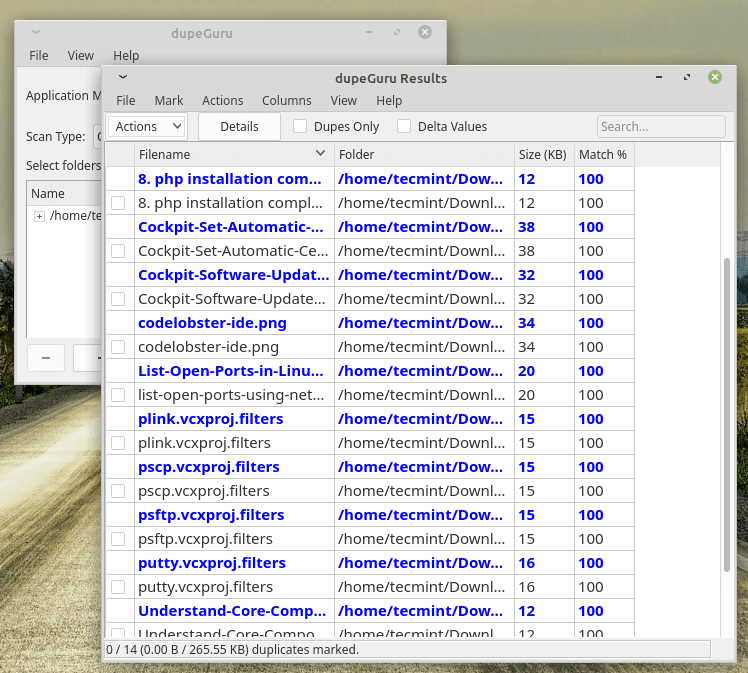
4. dupeGuru – Find Duplicate Files in a Linux
dupeGuru is an open-source and cross-platform tool that can be used to find duplicate files in a Linux system. The tool can either scan filenames or content in one or more folders. It also allows you to find the filename that is similar to the files you are searching for.
dupeGuru comes in different versions for Windows, Mac, and Linux platforms. Its quick fuzzy matching algorithm feature helps you to find duplicate files within a minute. It is customizable, you can pull the exact duplicate files you want to, and Wipeout unwanted files from the system.
Install dupeGuru on Linux
To install dupeGuru in Linux, use the following command as per your Linux distribution.
$ sudo apt install dupeguru         [On Debian, Ubuntu and Mint]
$ sudo yum install dupeguru         [On RHEL/CentOS/Fedora and Rocky/AlmaLinux]
$ sudo emerge -a sys-apps/dupeguru  [On Gentoo Linux]
$ sudo apk add dupeguru             [On Alpine Linux]
$ sudo pacman -S dupeguru           [On Arch Linux]
$ sudo zypper install dupeguru      [On OpenSUSE]
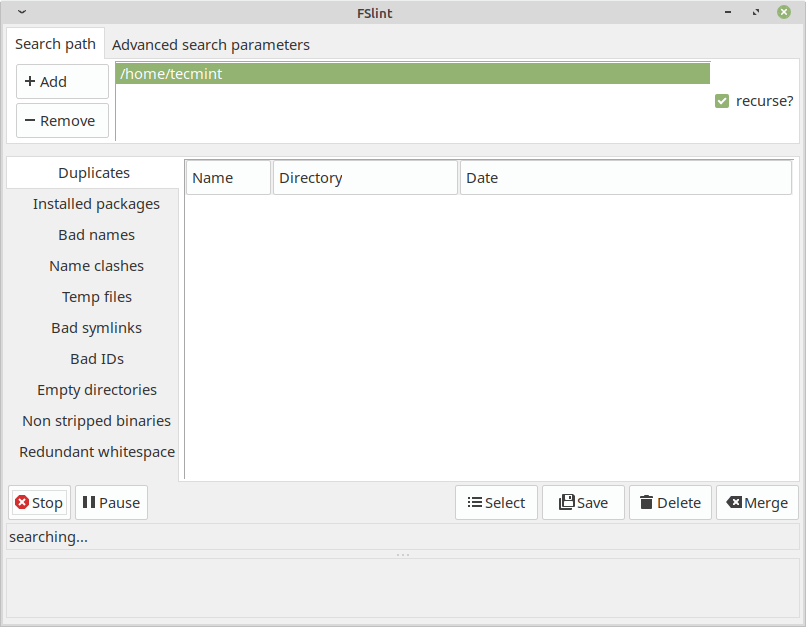
5. FSlint – Duplicate File Finder for Linux
FSlint is a free utility that is used to find and clean various forms of lint on a filesystem. It also reports duplicate files, empty directories, temporary files, duplicate/conflicting (binary) names, bad symbolic links, and many more. It has both command-line and GUI modes.
However, it’s important to note that as of my knowledge cutoff in September 2022, FSlint was last updated in 2013 and may not be actively maintained or compatible with newer Linux distributions.
Install FSlint on Linux
To install FSlint in Linux, use the following command as per your Linux distribution.
$ sudo apt install fslint         [On Debian, Ubuntu and Mint]
$ sudo yum install fslint         [On RHEL/CentOS/Fedora and Rocky/AlmaLinux]
$ sudo emerge -a sys-apps/fslint  [On Gentoo Linux]
$ sudo apk add fslint             [On Alpine Linux]
$ sudo pacman -S fslint           [On Arch Linux]
$ sudo zypper install fslint      [On OpenSUSE]
Conclusion
These are very useful tools to find duplicated files on your Linux system, but you should be very careful when deleting such files.
If you are unsure if you need a file or not, it would be better to create a backup of that file and remember its directory prior to deleting it. If you have any questions or comments, please submit them in the comment section below.
Archiso
Archiso is a highly-customizable tool for building Arch Linux live CD/USB ISO images. The official images are built with Archiso. It can be used as the basis for rescue systems, linux installers or other systems. This wiki article explains how to install Archiso, and how to configure it to control aspects of the resulting ISO image such as included packages and files. Technical requirements and build steps can be found in the official project documentation. Archiso is implemented with a number of bash scripts. The core component of Archiso is the mkarchiso command. Its options are documented in mkarchiso -h and not covered here.
Installation
Install the archiso or archiso-gitAUR package. The archiso-profilesAUR[broken link: package not found] package contains additional community-provided profiles.
Prepare a custom profile
Archiso comes with two profiles, releng and baseline.
- releng is used to create the official monthly installation ISO. It can be used as a starting point for creating a customized ISO image.
- baseline is a minimalistic configuration, that includes only the bare minimum packages required to boot the live environment from the medium.
To build an unmodified version of the profiles, skip to #Build the ISO. Otherwise, if you wish to adapt or customize one of archiso's shipped profiles, copy it from /usr/share/archiso/configs/profile-name/ to a writable directory with a name of your choice. For example:
$ cp -r /usr/share/archiso/configs/releng/ archlive
Proceed to the following sections to customize and build the custom profile.
Profile structure
An archiso profile contains configuration that defines the resulting ISO image. The profile structure is documented in /usr/share/doc/archiso/README.profile.rst[1].
Selecting packages
Edit packages.x86_64 to select which packages are to be installed on the live system image, listing packages line by line.
Custom local repository
To add packages not located in standard Arch repositories (e.g. custom packages or packages from AUR/ABS), set up a custom local repository and add your custom packages to it. Then add your repository to pacman.conf as follows:
archlive/pacman.conf
...
[customrepo]
SigLevel = Optional TrustAll
Server = file:///path/to/customrepo
...
- The ordering within
pacman.confmatters. To give top priority to your custom repository, place it above the other repository entries. - This
pacman.confis only used for building the image. It will not be used in the live environment. To do this, see #Adding repositories to the image.
Packages from multilib
To install packages from the multilib repository, simply uncomment that repository in pacman.conf.
Adding files to image
The airootfs directory is used as the starting point for the root directory (/) of the live system on the image. All its contents will be copied over to the working directory before packages are installed.
Place any custom files and/or directories in the desired location under airootfs/. For example, if you have a set of iptables scripts on your current system you want to be used on you live image, copy them over as such:
$ cp -r /etc/iptables archlive/airootfs/etc
Similarly, some care is required for special configuration files that reside somewhere down the hierarchy. Missing parts of the directory structure can be simply created with mkdir(1).
archlive/airootfs/root/. To add a file to all other users home directories, place it in archlive/airootfs/etc/skel/.By default, permissions will be 644 for files and 755 for directories. All of them will be owned by the root user. To set different permissions or ownership for specific files and/or folders, use the file_permissions associative array in profiledef.sh. See README.profile.rst for details.
Adding repositories to the image
To add a repository that can be used in the live environment, create a suitably modified pacman.conf and place it in archlive/airootfs/etc/.
If the repository also uses a key, place the key in archlive/airootfs/usr/share/pacman/keyrings/. The key file name must end with .gpg. Additionally, the key must be trusted. This can be accomplished by creating a GnuPG exported trust file in the same directory. The file name must end with -trusted. The first field is the key fingerprint, and the second is the trust. You can reference /usr/share/pacman/keyrings/archlinux-trusted for an example.
archzfs example
The files in this example are:
airootfs
├── etc
│   ├── pacman.conf
│   └── pacman.d
│       └── archzfs_mirrorlist
└── usr
    └── share
        └── pacman
            └── keyrings
                ├── archzfs.gpg
                └── archzfs-trusted
airootfs/etc/pacman.conf
...
[archzfs]
Include = /etc/pacman.d/archzfs_mirrorlist
...
airootfs/etc/pacman.d/archzfs_mirrorlist
Server = https://archzfs.com/$repo/$arch
Server = https://mirror.sum7.eu/archlinux/archzfs/$repo/$arch
Server = https://mirror.biocrafting.net/archlinux/archzfs/$repo/$arch
Server = https://mirror.in.themindsmaze.com/archzfs/$repo/$arch
Server = https://zxcvfdsa.com/archzfs/$repo/$arch
airootfs/usr/share/pacman/keyrings/archzfs-trusted
DDF7DB817396A49B2A2723F7403BD972F75D9D76:4:
archzfs.gpg itself can be obtained directly from the repository site at https://archzfs.com/archzfs.gpg.
Kernel
Although both archiso's included profiles only have linux, ISOs can be made to include other or even multiple kernels.
First, edit packages.x86_64 to include kernel package names that you want. When mkarchiso runs, it will include all work_dir/airootfs/boot/vmlinuz-* and work_dir/boot/initramfs-*.img files in the ISO (and additionally in the FAT image used for UEFI booting).
mkinitcpio presets by default will build fallback initramfs images. For an ISO, the main initramfs image would not typically include the autodetect hook, thus making an additional fallback image unnecessary. To prevent the creation of an fallback initramfs image, so that it does not take up space or slow down the build process, place a custom preset in archlive/airootfs/etc/mkinitcpio.d/pkgbase.preset. For example, for linux-lts:
archlive/airootfs/etc/mkinitcpio.d/linux-lts.preset
PRESETS=('archiso')

ALL_kver='/boot/vmlinuz-linux-lts'
ALL_config='/etc/mkinitcpio.conf'

archiso_image="/boot/initramfs-linux-lts.img"
Finally create boot loader configuration to allow booting the kernel(s).
Boot loader
Archiso supports syslinux for BIOS booting and GRUB or systemd-boot for UEFI booting. Refer to the articles of the boot loaders for information on their configuration syntax.
- The releng profile by default builds into an ISO that supports both BIOS and UEFI booting when burned to an optical disc using El Torito, or when written to a hard disk (or USB flash drive, or similar) using Isohybrid.
- Due to the modular nature of isolinux, you are able to use lots of addons since all .c32 files are copied and available to you. Take a look at the official syslinux site and the archiso git repo. Using said addons, it is possible to make visually attractive and complex menus. See [2].
mkarchiso expects that GRUB configuration is in the grub directory, systemd-boot configuration is in the efiboot directory, and syslinux configuration in syslinux and isolinux directories.
UEFI Secure Boot
If you want to make your Archiso bootable on a UEFI Secure Boot enabled environment, you must use a signed boot loader. You can follow the instructions on Secure Boot#Booting an installation medium.
systemd units
To enable systemd services/sockets/timers for the live environment, you need to manually create the symbolic links just as systemctl enable does it.
For example, to enable gpm.service, which contains WantedBy=multi-user.target, run:
$ mkdir -p archlive/airootfs/etc/systemd/system/multi-user.target.wants
$ ln -s /usr/lib/systemd/system/gpm.service archlive/airootfs/etc/systemd/system/multi-user.target.wants/
The required symlinks can be found out by reading the systemd unit, or if you have the service installed, by enabling it and observing the systemctl output.
Login manager
Starting X at boot is done by enabling your login manager's systemd service. If you do not know which .service to enable, you can easily find out in case you are using the same program on the system you build your ISO on. Just use:
$ ls -l /etc/systemd/system/display-manager.service
Now create the same symlink in archlive/airootfs/etc/systemd/system/. For LXDM:
$ ln -s /usr/lib/systemd/system/lxdm.service archlive/airootfs/etc/systemd/system/display-manager.service
This will enable LXDM at system start on your live system.
Changing automatic login
The configuration for getty's automatic login is located under airootfs/etc/systemd/system/getty@tty1.service.d/autologin.conf.
You can modify this file to change the auto login user:
[Service]
ExecStart=
ExecStart=-/sbin/agetty --autologin username --noclear %I 38400 linux
Or remove autologin.conf altogether to disable auto login.
If you are using the serial console, create airootfs/etc/systemd/system/serial-getty@ttyS0.service.d/autologin.conf with the following content instead:
[Service]
ExecStart=
ExecStart=-/sbin/agetty -o '-p -- \\u' --noclear --autologin root --keep-baud 115200,57600,38400,9600 - $TERM
Users and passwords
To create a user which will be available in the live environment, you must manually edit archlive/airootfs/etc/passwd, archlive/airootfs/etc/shadow, archlive/airootfs/etc/group and archlive/airootfs/etc/gshadow.
For example, to add a user archie. Add them to archlive/airootfs/etc/passwd following the passwd(5) syntax:
archlive/airootfs/etc/passwd
root:x:0:0:root:/root:/usr/bin/zsh
archie:x:1000:1000::/home/archie:/usr/bin/zsh
passwd file must end with a newline.Add the user to archlive/airootfs/etc/shadow following the syntax of shadow(5). If you want to define a password for the user, generate a password hash with openssl passwd -6 and add it to the file. For example:
archlive/airootfs/etc/shadow
root::14871::::::
archie:$6$randomsalt$cij4/pJREFQV/NgAgh9YyBIoCRRNq2jp5l8lbnE5aLggJnzIRmNVlogAg8N6hEEecLwXHtMQIl2NX2HlDqhCU1:14871::::::
Otherwise, you may keep the password field empty, meaning that the user can log in with no password.
Add the user's group and the groups which they will part of to archlive/airootfs/etc/group according to group(5). For example:
archlive/airootfs/etc/group
root:x:0:root
adm:x:4:archie
wheel:x:10:archie
uucp:x:14:archie
archie:x:1000:
Create the appropriate archlive/airootfs/etc/gshadow according to gshadow(5):
archlive/airootfs/etc/gshadow
root:!*::root
archie:!*::
Make sure /etc/shadow and /etc/gshadow have the correct permissions:
archlive/profiledef.sh
...
file_permissions=(
  ...
  ["/etc/shadow"]="0:0:0400"
  ["/etc/gshadow"]="0:0:0400"
)
After package installation, mkarchiso will create all specified home directories for users listed in archlive/airootfs/etc/passwd and copy work_directory/x86_64/airootfs/etc/skel/* to them. The copied files will have proper user and group ownership.
Changing the distribution name used in the ISO
Start by copying the file /etc/os-release into the etc/ folder in the rootfs. Then, edit the file accordingly. You can also change the name inside of GRUB and syslinux.
Build the ISO
Build an ISO which you can then burn to CD or USB by running:
# mkarchiso -v -w /path/to/work_dir -o /path/to/out_dir /path/to/profile/
-wspecifies the working directory. If the option is not specified, it will default toworkin the current directory.-ospecifies the directory where the built ISO image will be placed. If the option is not specified, it will default tooutin the current directory.- It should be noted the profile file
profiledef.shcannot be specified when running mkarchiso, only the path to the file.
Replace /path/to/profile/ with the path to your custom profile, or with /usr/share/archiso/configs/releng/ if you are building an unmodified profile.
# mkarchiso -v -w /tmp/archiso-tmp /path/to/profile/
When run, the script will download and install the packages you specified to work_directory/x86_64/airootfs, create the kernel and init images, apply your customizations and finally build the ISO into the output directory.
Removal of work directory
/run/media/user/label gets bound within work/x86_64/airootfs/run/media/user/label during the build process).The temporary files are copied into work directory. After successfully building the ISO , the work directory and its contents can be deleted. E.g.:
# rm -rf /path/to/work_dir
Using the ISO
See Installation guide#Prepare an installation medium for various options.
Test the ISO in QEMU
Install the optional dependencies qemu-desktop and edk2-ovmf.
Use the convenience script run_archiso to run a built image using QEMU.
$ run_archiso -i /path/to/archlinux-yyyy.mm.dd-x86_64.iso
The virtual machine can also be run using UEFI emulation:
$ run_archiso -u -i /path/to/archlinux-yyyy.mm.dd-x86_64.iso
Tips and tricks
Online build
If you do not have an arch system available or you need to setup Archiso from another GNU/Linux distribution, be aware there exists an online builder.
Prepare an ISO for an installation via SSH
archlinux-2021.02.01-x86_64.iso, cloud-init support is provided, and sshd.service is enabled by default.To install Arch Linux via SSH without any interaction with the system, an SSH public key must be placed in authorized_keys.
Adding the SSH key can either be done manually (explained here), or by cloud-init.
To add the key manually, first copy Archiso's releng profile to a writable directory. The following example uses archlive.
$ cp -r /usr/share/archiso/configs/profile/ archlive
Create a .ssh directory in the home directory of the user which will be used to log in. The following example will be using the root user.
$ mkdir archlive/airootfs/root/.ssh
Add the SSH public key(s), which will be used to log in, to authorized_keys:
$ cat ~/.ssh/key1.pub >> archlive/airootfs/root/.ssh/authorized_keys
$ cat ~/.ssh/key2.pub >> archlive/airootfs/root/.ssh/authorized_keys
Set correct permissions and ownership for the .ssh directory and the authorized_keys file:
archlive/profiledef.sh
...
file_permissions=(
  ...
  ["/root"]="0:0:0750"
  ["/root/.ssh"]="0:0:0700"
  ["/root/.ssh/authorized_keys"]="0:0:0600"
)
Finally build the ISO. Upon booting the ISO, OpenSSH will start and it will be possible to log in using the corresponding SSH private key(s).
Automatically connect to a Wi-Fi network using iwd
Create /var/lib/iwd/ inside the profile's airootfs directory and set the correct permissions:
$ mkdir -p archlive/airootfs/var/lib/iwd
archlive/profiledef.sh
...
file_permissions=(
  ...
  ["/var/lib/iwd"]="0:0:0700"
)
Follow the instructions in iwd#Network configuration and iwd.network(5) to create a network configuration file for your Wi-Fi network.
Save the configuration file inside archlive/airootfs/var/lib/iwd/.
Adjusting the size of the root file system
When installing packages in the live environment, for example on hardware requiring DKMS modules, the default size of the root file system might not allow the download and installation of such packages due to its size.
It will manifest as the following error message when downloading files or installing packages in the live environment:
error: partition / too full: 63256 blocks needed, 61450 blocks free
error: not enough free disk space
error: failed to commit transaction (not enough free disk space)
Errors occurred: no packages were upgraded.
To adjust the size on the fly:
# mount -o remount,size=SIZE /run/archiso/cowspace
See tmpfs(5) § size for the possible parameters of SIZE.
To adjust the size at the bootloader stage (by pressing e or Tab) use the boot option:
cow_spacesize=SIZE
To adjust the size while building an image add the boot option to:
efiboot/loader/entries/*.cfggrub/*.cfgsyslinux/*.cfg
The result can be checked with:
$ df -h
See mkinitcpio-archiso boot parameters.
Encryption
In order for vanilla mkarchiso to produce encrypted images, LUKS support in archiso, encrypt hook's compatibility in mkinitcpio-archiso and nested cryptkeys support in cryptsetup merge requests need to be approved.
Packages with such features already merged are archiso-encryptionAUR[broken link: package not found], mkinitcpio-archiso-encryptionAUR[broken link: package not found] and cryptsetup-nested-cryptkeyAUR[broken link: package not found].
To enable encryption on an existing profile:
- add
+luksto theairootfs_image_typevalue inprofiledef.sh; - set an
encryption_keyinprofiledef.sh(to use a key file instead of a password). - enable the
encrypthook in/etc/mkinitcpio.conf; - add AUR packages (or build custom replacements with the aforementioned sources) to
packages.x86_64 - add the
keysbuildmode to thebuildmodesarray inprofiledef.sh(to build a second ISO containing the key file that put on external storage is able to boot the system).
Example configurations based on the baseline and releng profiles are available as ebaseline and ereleng in the archiso-profilesAUR[broken link: package not found] package.
Google Compute Engine images
A Google Compute Engine-compatible releng compressed image is available as archlinux-gceAUR[broken link: package not found].
Libvirt VM configuration
A libvirt configuration which runs the releng image is available as archlinux-libvirtAUR[broken link: package not found].
Troubleshooting
Window manager freezes
If you want to use a window manager in the Live CD, you must add the necessary and correct video drivers, or the WM may freeze on loading.